Get To Know Your Muscles

Top 10 Muscles That Respond To Dry Needling

Top 10 Muscles That Respond To Dry Needling

One of the benefits of dry needling is it's a very precise way of releasing a muscle. 

Compared to massage, getting a twitch response out of a muscle gives a very predictable and effective release, deep from within the muscle belly.

In this post, I wanted to give you some insight into some of the best responding muscles that dry needling can help with.

If you want to learn more about exactly how dry needling works, please read more here.

Of course dry needling can be done to any muscle.   The following post is to give you some insight into some commonly treated muscles that give especially good 'bang for your buck'.

*Please also see some important notes at the end of the post.

1.  Deltoids

deltoid-all-tps.gif

In terms of shoulder pain, the deltoid is a very under-rated muscle.

The deltoids include three sections (anterior, middle and posterior) that sit superficially around the shoulder.  The deltoid is involved in almost all shoulder movement.

The way the it wraps around the shoulder makes it a very difficult muscle to stretch and it is prone to building up tension.

Trigger points and knots often develop in the deltoid that can give rise to shoulder pain (see pic above). 

This pain can be quite severe and unrelenting and stubborn to usual treatment.

A common history is over-doing some push-ups and waking up the next day with pain in the front of the shoulder. 

Or someone who has done a lot of heavy over-head weights (Cross fitters...!) over the years and doesn't do much stretching. 

Sometimes it's the last small movement and final straw the breaks the camels back so to speak.

Dry needling the deltoid often gets some powerful twitch responses. 

Expect soreness and a dead arm feeling for a few days before things settle down.

2. Latissimus Dorsi

latissimus-dorsi-trp.jpg
Latissimus_dorsi.PNG

The latissimus dorsi is a fascinating muscle. 

It has attachments to the hip, shoulder, upper back, lower back and rib cage - and that makes it the largest muscle in the upper body.

Tightness in the latissimus dorsi has been shown to be an important cause of chronic shoulder pain and chronic back (especially upper back) pain.

Because of its extensive attachments, it can be another difficult muscle to stretch effectively. 

Dry needling gets in there and gets the job done.

If your lats are tight, you will need to add in some regular childs pose and over-head stretching, in addition to foam rolling your upper back.
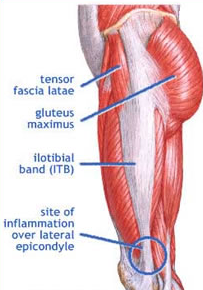
3. TFL / ITB

438.jpg

The fastest way to release your ITB

Release the under-rated small muscle that attaches to it, called the Tensor Fascia Latae (TFL).

The TFL is a small but powerful hip flexor and usually tight from excessively sitting, walking, running and cycling.

When overly tight, can contribute to knee pain by causing mis-tracking of the kneecap. 

Combine dry needling with some specific gluteal activation and you will be well and truly on the way to saying goodbye to your ITB pain and tightness. 

If you look after your TFL well, there's a good chance that excruiating ITB foam rolling will not be required.  Happy days :-)

4. Glutes

Gluteus Medius_0.jpg

One of the cool things about dry needling is that we can access deep points in a muscle that you would otherwise be unable to access.  

The gluteus medius is an interesting muscle that can be dysfunctional in chronic lower back pain, hip pain and knee pain.  

Dry needling can immediately 're-set' the glutes and allow for a graduated re-loading program. 

Long-term, a well functioning gluteus medius will protect your hips, knees, ankles and lower back. 

5. Calf - Gastrocnemius & Soleus

Gastrocnemius.jpg

Calf muscle tension and limited flexibility is especially common in the modern age. 

When tight, the calf muscles are prone to cramping and eventually tearing.

Deep tissue massage can be effective, but can be very painful, bordering on intolerable.

Dry needling to the calf muscles, whilst intense, is quicker and more effective in its release. 

Expect some treatment soreness for 1-2 days post-needling.

And don't forget to re-build your calf capacity with an appropriate strengthening program.
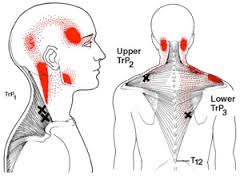
6. Upper Trapezius

78b36a394ffbec76dc123158ae7dcda7.jpg

Much like the calf above, the upper traps can be loaded with tightness. 

Causes can include poor posture, lack of physical activity and prolonged stress. 

Heavy handed massage can stir up more irritation in the muscle.

Dry needling is more like using a sniper approach - with a few direct releases, you can release the traps and get the blood flowing much more effectively and deeply. 

This study recommended dry needling for immediate pain reduction in upper body myofascial trigger point dysfunction.

Using heat on the traps via a wheat pack is really helpful, especially in the evening before bed.

Also make sure you are getting enough down time as chronic upper traps tension is a sign of sympathetic over-activity.

7. Infraspinatus

Infraspinatous-TrPs.jpg

The infraspinatus is a sneaky little muscle that sits behind your shoulder blade. 

It is often weak and gets overloaded when using your arm and shoulder.  

When the infraspinatus gets tight, you'll often feel pain in the front and deep part of your shoulder.

Dry needling de-activates the trigger points quickly, but be prepared for a dead arm for a few hours.

Don't forget to re-build with some simple strengthening exercises with a thera-band.


8. Wrist Extensors

extensor-digitorum-ring-finger-trp.jpg

Tennis elbow is a very common condition that primarily affects the extensor tendons on the outside of the forearm. 

The pain often drags on for months and years due to a very poor blood supply in the elbow tendons.

The research shows that dry needling releases a very specific chemical, known as Platelet-Derived Growth Factor (PDGF), that produces a strong increase in blood flow into the muscle.

In effect, blood is a healing agent, bringing oxygen and critical healing chemicals to the damaged cells.

No other technique that I know of is capable of doing this.

9. Biceps

biceps-tps.jpg

When was the last time you stretched your bicep muscle?  

Another muscle that gets used a lot, and builds up a great deal of tension. 

You'd be surprised how that niggling pain in the front of your shoulder improves after your biceps is released through dry needling.
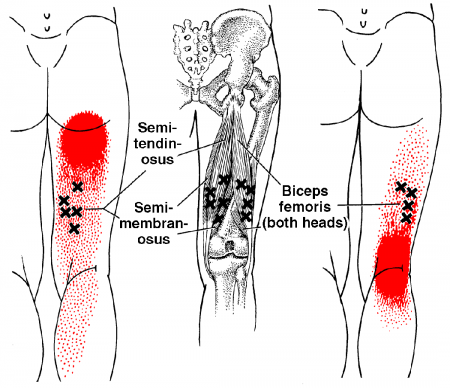
10. Hamstrings

Biceps Femoris, Semitendinosus, Semimembranosus.png

Tight hamstrings are pretty common. 

Stretching them normally does more harm than good (see here).  

Dry needling produces a quick and effective release.

Specific strengthening exercises that lengthen the muscle gives the best long term solution. 

Conclusion

Dry needling certainly isn't for everyone, but it can be a very effective and powerful treatment in the right context. 

Two quick notes:

1.  There are different types of dry needling and this blog refers to the type that activates a local twitch response. 

This is very different to acupuncture and dry needling where the needles are inserted superficially and left in for 20 minutes as the practitioner leaves the room. 

2.  Dry needling is always used as part of comprehensive treatment approach

This includes assessing your thoughts and beliefs about your injury, movement patterning and general health considerations. 

Specific exercises targeted towards your individual needs will help give you the best long-term outcome.

If you have any questions about dry needling - please feel free to give us a call 1300 657 813.

If you'd like to schedule a dry needling session and start feeling better straight away, please book online below:

How To Make Friends With Your Hamstrings

The hamstrings have a long history of being the 'enemy' of good movement.

Tight, painful, cramping and all around bad guy, the poor old hammy cops a lot of negative press.

In this blog post, I wanted to share my thoughts with you about how to make friends with the hamstrings so you can all get on well together. 

What are the hamstrings?

The hamstrings are made up of three muscles - the inside two are called the semimembranous and semitendinosus and the large outside hamstring is known as the biceps femoris. 

The back of a right leg from hip to knee

The back of a right leg from hip to knee

In a bigger contex:

The Superficial Back Line, from Thomas Myers Anatomy Trains

The Superficial Back Line, from Thomas Myers Anatomy Trains

The hamstrings are part of the Superficial Back Line - which is a myofascial line of tissue that incorporates the muscles and fascia from the bottom of the foot up to the back of the head. 

When one area isn't functionally overly well, there will be compensations up or down the chain.  Ever heard of hamstring issues affecting your lower back? 

Tight hamstrings means that the instead of stretch and movement occurring through the back of the leg, the lower back gets compressed, especially when sitting or bending forwards. 

That is one of the reasons we take a holistic view of your body and movement when you come in for an assessment.  We leave no stone unturned in our quest to get to the source of your problem. 

It doesn't matter where you feel your symptoms, we don't chase pain.  We focus on finding the weak link/primary source and then allow your (powerful healing) body to do the rest.

"Where you think it is, it ain't" - Ida Rolf

What is the role of the hamstrings?

The primary role of the hamstrings in walking and running is to eccentrically control the landing of the foot.  The hamstring complex undergoes a substantial eccentric contraction during the late swing phase (Yu et al, 2008) of gait.

Eccentric refers to a type of contraction where a muscle lengthens while contracting vs a concentric contraction where the muscle in contracting and shortening (e.g. doing a bicep curl). 

As you can see, just before your foot lands, your knee is going from a bent position to an extended straight position and the hamstrings job is to allow for a controlled, smooth landing.

As you can see, just before your foot lands, your knee is going from a bent position to an extended straight position and the hamstrings job is to allow for a controlled, smooth landing.

Whilst it is important to have adequate flexibility, the actual more important job of the hamstring to have enough strength and capacity to walk and run properly.

If a muscle doesn't have much capacity to contract when needed, it will most likely get overloaded.  When it gets overloaded, it's muscle fibers contract and knot up, limiting flexibility.

For a runner, strength and stability trumps flexibility everyday of the week.

Trigger points in the hamstrings can refer pain to the upper thigh, buttock and around the knee

Trigger points in the hamstrings can refer pain to the upper thigh, buttock and around the knee

3 Steps To Making Friends With Your Hamstrings:

1.  Stop stretching them. 

Never again do a standing hamstring stretch.  I don't mean avoid it for a few weeks or months.

I mean NEVER* do this stretch whilst you are alive on this planet! 

Like an addict, you gotta give it up cold turkey. 

Yes, you can still do yoga and downward dog and continue to move through functional range of movements but no mindless, static stretching. 

Stretching in this position, you are actually making the hamstring weaker

Stretching in this position, you are actually making the hamstring weaker

Hang on a sec...I thought stretching was a good thing!?

Stretching the hamstring in this position, you are actually making the hamstring weaker and sending confusing mixed messages to the brain about what the function of the muscle is. 

Anytime your brain is confused, it's going straight into fight-flight mode and will want to tighten everything up to protect it.

Intuitively stretching feels good and it often does give some short term relief. 

But in the long run, with continued stretching, the hamstring becomes weaker and more likely to become overloaded and tight.  Then you've got yourself into a real pickle. 

The hamstring, once locked down, becomes an inefficient blob that hampers everything you try and do.

Our first step in making friends with the hamstring is to stop pissing it off, so no more stretching. 

By the way, as an added bonus, your lower back pain and sciatica will thank you as the standing hamstring stretch has a good way of irritating it.

*If you desperately feel the need to stretch, then you can apply heat packs or use the foam roller/spiky ball directly on the muscle. 

2.  Reset.

To reset the hamstrings, I recommend first releasing the muscle with 3-4 sessions of deep tissue dry needling and myo-fascial release massage.  This is like pushing re-set on your muscle tone and creating a fresh slate to work with.  After a few sessions, the muscle will release and then we can move onto the final step.

It's important to get a twitch response that stimulates the blood flow and releases the chemicals in the muscle that have been holding it tight. 

Be prepared for some significant post-treatment soreness for a 1-2 days.  Months/years/decades of tightness ain't going down without a fight!

Check out more about dry needling here and see how it can get your healing on the fast track. 

3.  Build 'Em Back Up.

The biggest issue around the hamstring is it's near universal lack of strength

When was the last time you did a specific hamstring strengthening exercise? 

Most of us tend towards an excessive quads/hip flexors vs hamstrings ratio due to excess sitting, walking and running. 

Quads are strong, hammies weak.

This imbalance is perceived by the hamstrings as threatening

Powerfully contracting the quads during the running and kicking motion could potentially damage the hamstring. 

How does the brain / muscle respond to threat? 

You guessed - it tightens up.

Graduated Strengthening Program For Hamstrings:

The best long term strategy to make friends with your hamstrings is to build capacity so they can perform their job of eccentrically controlling the foot in landing.

If the hamstrings can happily do their job, they'll most likely start to feel safe, protected and will naturally start to release all on their very own. 

Trust me, I'm a Physiotherapist!

It will take time (3-6 months) to build strength, so listen to your body and take it easy at the start.  If you can only manage 2-3 reps in the beginning, that is fine.  No rushing!

The goal is to push the hamstring to fatigue (feeling some hamstring soreness the following day is a good sign) and then allow it to adapt, recover and get stronger

Make sure you create the right environment for healing via eating well (protein + vegies), drink plenty of water and get enough sleep.

Aim to do these strengthening exercises twice per week.

How many reps? 

If you figure every 10k your run is approximately 5,000 steps on each side, then the hamstring needs a fair amount of endurance capacity.  I would keep gradually increasing the reps until you are not feeling any pain on your walks and runs.

Quick note: avoid the hamstring curl machine at the gym.  This exercise strengthens and shortens the hamstring, which is what you don't want.

Step 1: Bridge

Try 3 x 30 sec holds.  Relax your lower back and squeeze your glutes.  Tuck your pelvis so you feel the opening of the front of the hips. 

Try 3 x 30 sec holds.  Relax your lower back and squeeze your glutes. 

Tuck your pelvis so you feel the opening of the front of the hips. 

Keep the bridge high as you extend one leg in front.  Hold for one breath and then switch sides.  When you can repeat x 10 each side, move to step 2.

Keep the bridge high as you extend one leg in front. 

Hold for one breath and then switch sides.  When you can repeat x 10 each side, move to step 2.

Step 2: Bridge on Foam Roller

Make sure the roller isn't too far away from you, otherwise the hamstrings will cramp.   The goal is to gradually build up the strength in the hamstrings.  It may take 3-6 months so no rushing.  If you push too hard, then you mos…

Make sure the roller isn't too far away from you, otherwise the hamstrings will cramp.  

The goal is to gradually build up the strength in the hamstrings.  It may take 3-6 months so no rushing. 

If you push too hard, then you most likely will lock the muscle down and you'll have to start over.

When you can complete 3 x 10 reps on each side, move onto step 3.

When you can complete 3 x 10 reps on each side, move onto step 3.

Step 3: Hamstring Curls on Swiss Ball

The perfect Eccentric Hamstring Exercise: Strengthening AND lengthening.Quickly pull the ball in towards you and then SLOWLY (slow as you can) lower the ball away from you.  Count to as least 5 seconds as you do this.  Repeat until fatigue…

The perfect Eccentric Hamstring Exercise: Strengthening AND lengthening.

Quickly pull the ball in towards you and then SLOWLY (slow as you can) lower the ball away from you. 

Count to as least 5 seconds as you do this. 

Repeat until fatigue. and then do another x 2 rounds. 

If you can do x 30 reps pretty easily, try one legged.

Practicing this movement will have a direct improvement on your hamstring problems, especially for runners.

Step Four: Single Leg Deadlift

Hold a dumbbell in each hand and stand on your right leg, lifting your left leg a few inches behind you (a). Keeping your back straight, lean forward from your hips until your body is almost parallel to the floor, the weights in line with your shoul…

Hold a dumbbell in each hand and stand on your right leg, lifting your left leg a few inches behind you (a). Keeping your back straight, lean forward from your hips until your body is almost parallel to the floor, the weights in line with your shoulders (b). Return to start.  Do 12, then switch legs.

Bonus Tip:

Don't forget to strengthen the glutes, lower back and calf muscles above and below the hamstring.  Often if these muscles have reduced capacity, the hamstring can become overloaded and then lock down. 


So there you have it.

Have a go and please write in the comments how you get on.

I'd really appreciate your feedback :-)


References:

Hamstring muscle kinematics and activation during overground sprinting.

Yu B, Queen RM, Abbey AN, Liu Y, Moorman CT, Garrett WE. J Biomech. 2008 Nov 14;41(15):3121-6

A newly discovered muscle: The Tensor of the Vastus Intermedius (TVI)

A group of researchers in Switzerland and Australia have identified a new muscle in the thigh.  Part of the quadriceps, this muscle attaches to the upper outside of your thigh, near the Tensor Fascia Latae, and runs down to your patella.  It's called the Tensor Vastus Intermedius (TVI). 

Looking at the left anterior thigh, (from the front) 1- Tensor Vastus Intermedius (TVI)  2- Vastus Lateralis (VL)  3- Vastus Intermedius (VI) 4- Tensor Fasia Latae (TFL)  5- Rectus Femoris (RF)  6- Vastus Medialis (VM) _Picture f…

Looking at the left anterior thigh, (from the front) 1- Tensor Vastus Intermedius (TVI)  2- Vastus Lateralis (VL)  3- Vastus Intermedius (VI) 4- Tensor Fasia Latae (TFL)  5- Rectus Femoris (RF)  6- Vastus Medialis (VM) _Picture from research article Grob et al

The researchers made the discovery after examining 26 cadavers.  They found the TVI combined with an aponeurosis merging separately into the quadriceps tendon and inserting on the medial aspect of the patella.  Essentially, they found an additional muscle belly between the vastus lateralis and intermedius.

Reference: Netter, Atlas of Human Anatomy

Reference: Netter, Atlas of Human Anatomy

Implications

Like the TFL the TVI likely carries a lot of tension from repeated hip flexion and knee extension. 

This could have implications in particular for:

  •  runners, cyclists and athletes in involved in kicking sports such as soccer and football

Dr. Ed Wittich from BAT Logic says:

"The new discovery of the TVI will not have a large impact on clinical approaches but may indeed make us think differently about the forces on the patella and the way that the quadriceps group works together. This is not just a slip but in fact an actual muscle belly, with independent nerve and vascular supplies. The mechanical model for force production and function of the quads may indeed be adjusted based on this addition to the known attachments and line of pull on the patella and even if it doesn’t, in effect it should create a change for the name for the Quads - Quins maybe?!"

If you've ever foam rolled the upper part of the quads towards the outside, you've probably experienced a lot of tightness/pain here (along with the other superficial muscles in the region). If you've had knee pain/patella tracking issues, the TVI could be playing a role in the dysfunction.

Whilst it's exciting to find a 'new muscle', much of the rehabilitation these days is focused on functional movement patterns and thinking more broadly.  Osteopath Bill Adamson from Errol Street Osteo in Melbourne states:

"Movement patterns are still the main issue facing knee joints the world over.  When addressing the knee we will still look at the hip and the ankle as well as the low back to make sure movement/load is evenly distributed across them.  The great thing with running and cycling coaches is they look at all overall movement efficiency. Which is the even spread of load across the body.  When there is a gross error in the way that an athlete moves then a manual therapist or movement specialist may regress the athlete to incorporate a specific muscle activation.


Summary

  • The discovery of this new muscle confirms the complexity of the human body and our knowledge base is still a 'work in progress'
  • I think rolling the lateral upper quads is way underutilized and can help a lot with ongoing knee pain especially in runners and cyclists
  • Deep trigger point dry needling may have more of a role to play to release this newly discovered muscle

Stay tuned to find out more!


Get To Know Your Muscles - TFL (Tensor Fasciae Latae)

Author: Daniel O'Grady is a Physiotherapist in Adelaide, Australia.

Most people know about their ITB (Ilio Tibial Band)  that runs on the outside of the thigh; but not as many are familiar with the strip of muscle that joins the upper part of the ITB to the pelvis. 

This small muscle is known as the TFL (Tensor Fasica Latae). 

If you’ve ever had problems with your knee, hip, lower back, calf or achilles, chances are you have some unresolved tightness in your TFL.


QUICK ANATOMY REVIEW:

As you can see in the picture, the ITB has upper attachments to both the gluteals and the TFL.  Any dysfucntion/weakness in the glutes means that the TFL needs to work proportionally harder.  Gluteal inhibition is common - especially if you spend a lot of time sitting.


PALPATE THE TFL ON YOURSELF:

To feel the TFL, place your finger on your front of your pelvic bone.  Slowly move down and to the outside of the thigh until you feel a ropey muscle that is the the width a finger.  It may be tender to touch.


FUNCTION:

The TFL is a hip flexor, abductor and internal rotator.  It works in conjunction with the gluteus medius and gluteus maximus to stabilise the leg during the stance phase of walking and running.  The TFL anteriorly rotates your pelvis.  Functionally, the TFL is part of the Lateral Line and the Spiral line, according to Thomas Myers in his book Anatomy Trains.

The Lateral Line

The Lateral Line

The Spiral Line

The Spiral Line


SYMPTOMS:

Overload of the TFL can lead to pain and tightness in the front of the hip.  Very common is also pain and tightness in the outer part of the knee and into the ITB.  This is most noticeable when walking or up and down stairs/hills. 

Other symptoms:

  • knee and hip pain (especially outside)

  • the lower back and SIJ

  • upper back

  • calf and achilles

As the TFL pulls the head of the femur bone forwards, chronic increased tone is one of the prime causes of hip osteoarthritis and degeneration. 

HOW THE TFL BECOMES OVERLOADED:

The TFL becomes overloaded with repeated use in the following situations:

  • excessive sitting, driving, kicking

  • walking and running (especially uphill and downhill)

  • cycling, swimming, kayak/canoe

  • meditating crossed legged in lotus position

  • sleeping in the fetal position

  • standing with a swayed back and wearing high heels too often

TREATMENT:

Physiotherapy assessment will involve a comprehensive movement assessment to determine the cause of your TFL issue.

Short term treatment such as soft tissue massage and dry needling is very helpful, while long term building gluteal and core strength is critical to prevent a relapse.


TRIGGER POINT DRY NEEDLING:

Tightness and shortening of the TFL responds well to dry needling, which can de-activate the trigger points (knots in the muscle) that can form in chronic cases.  The benefit of dry needling is that it can reach the deep fibers of the muscle and lead to a quicker resolution of symptoms.  Dry needling is certainly an unusual feeling, but definitely beats 15 minutes of deep painful massage in that area.


SELF-CARE TIPS:

  • apply heat to the front of your hip 10 minutes each day

  • avoid sitting cross legged

  • avoid walking and jogging uphills and on sloped surfaces in the short-term

  • ensure your shoes are not overly worn

  • sleep on stomach or side with pillow between knees

  • when running - avoid over-striding and endure proper warm up and cool down

  • use cruise control on long car trips to stretch the legs


GRADED EXERCISE PROGRAM TO ADDRESS TFL OVERLOAD:

PART 1 STRETCHES:

FOAM ROLLER ITBRegulate the pressure with your arms and top leg, so pain is less than 5/10.

FOAM ROLLER ITB

Regulate the pressure with your arms and top leg, so pain is less than 5/10.

FOAM ROLLER QUADSGo harder along the quads. Keep breathing!

FOAM ROLLER QUADS

Go harder along the quads. Keep breathing!

HIP FLEXOR STRETCHFeel the stretch in the front of your hip as you tuck the pelvis under gently

HIP FLEXOR STRETCH

Feel the stretch in the front of your hip as you tuck the pelvis under gently

FOAM ROLLER TFLAngle your body across the TFL and roll it with medium to light pressure

FOAM ROLLER TFL

Angle your body across the TFL and roll it with medium to light pressure

PRONE EXTENSION COBRA DECOMPRESSIONRelax on your forearms, let your hips release at the front. Breathe through the diaphragm

PRONE EXTENSION COBRA DECOMPRESSION

Relax on your forearms, let your hips release at the front. Breathe through the diaphragm

PART 2 STRENGTHENING:

The goal is to strengthen and support the muscles around the TFL

BRIDGEFeel a stretch in the front of your hips while your glutes activate in the back of the hips

BRIDGE

Feel a stretch in the front of your hips while your glutes activate in the back of the hips

CLAM SHELLEnsure hips stay facing the front and you feel the gluteus medius (back of the hip) activating

CLAM SHELL

Ensure hips stay facing the front and you feel the gluteus medius (back of the hip) activating

SINGLE-LEG BRIDGEKeep the bridge high as your transfer your weight to each side. Keep activation through the glutes

SINGLE-LEG BRIDGE

Keep the bridge high as your transfer your weight to each side. Keep activation through the glutes

PUSH-UP TO SIDE-PLANKActivate the obliques as you twist into side plank. Try x3 on each side.

PUSH-UP TO SIDE-PLANK

Activate the obliques as you twist into side plank. Try x3 on each side.

PLANKFeel the abdominals support your body. Hold 30 seconds. Keep breathing!

PLANK

Feel the abdominals support your body. Hold 30 seconds. Keep breathing!


PART 3: POSTURE / NEW MOVEMENT PATTERNS

For many people, the TFL becomes the muscle that is always switched on and over-active.

Try these movements, focusing on keeping your core and gluteals engaged.
STANDING PELVIC-TILTSUse the abdominals to gently tuck the pelvic under. Keep the shoulders relaxed and breathe through the diaphragm. x10 per hour.

STANDING PELVIC-TILTS

Use the abdominals to gently tuck the pelvic under. Keep the shoulders relaxed and breathe through the diaphragm. x10 per hour.

STANDING HAMSTRING CURLSKeep the pelvis tucked under and abdominals engaged as you bend the knee by activating the hamstring. Keep the knees aligned during the entire exercise. 3 x10 each side.

STANDING HAMSTRING CURLS

Keep the pelvis tucked under and abdominals engaged as you bend the knee by activating the hamstring. Keep the knees aligned during the entire exercise. 3 x10 each side.

REVERSE LUNGEFeel the stretch in the front of your left hip as you stretch back and drop the knee towards the ground. Keep your spine straight while gently tucking your pelvic under. x10 each side.

REVERSE LUNGE

Feel the stretch in the front of your left hip as you stretch back and drop the knee towards the ground. Keep your spine straight while gently tucking your pelvic under. x10 each side.

SIT TO STAND SQUATSFocus on activating the glutes and core as you come up into standing by gently pulling your pelvis under.

SIT TO STAND SQUATS

Focus on activating the glutes and core as you come up into standing by gently pulling your pelvis under.

Stick your butt out as you slowly sit down, keeping your feet and toes in contact with the ground. Repeat 3x10

Stick your butt out as you slowly sit down, keeping your feet and toes in contact with the ground. Repeat 3x10

Enjoyed this blog post?

Donate