ITB

Is it worth foam rolling your ITB?

If you walk into any gym, you may see someone sadistically foam rolling their ITB, making all sorts of interesting faces.

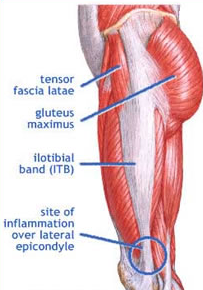
The ITB, if you are unsure, stands for Ilio-Tibial Band - that is the long fibrous tissue that runs from the hip down to the knee along the outside of your thigh (see pic below).

An irritated ITB can lead to pain and inflammation in the outside of the knee, especially in runners and cyclists. If not addressed early, this can lead to ongoing pain and can be tricky to manage.

Screen Shot 2020-03-29 at 8.20.12 pm.png

To roll or not to roll?

Recently there has been a lot of noise being made about the fact that regular foam rolling and stretching doesn’t physically change the ITB at all.

Some researchers point out that it is impossible to ‘release’ your ITB with a foam roller because it takes thousands of kilograms of pressure to change it.

Proponents for the foam roller say that it helps keep the tightness under control and prevents runner’s knee.

Who is right?

Well yes the ITB is made from very tense connective tissue are it probably doesn’t change all that much. And I’d definitely agree you can easily stir things up if you are constantly and aggressively rolling.

And you don’t want to have super loose ITB’s either - having strong and resilient ITB’s are an important part strong and efficient running form.

Ideally, you want to have them ‘in-tune’ like a musical instrument - not too tight or too loose.

What is really happening when you roll?

While it is hard to say for sure, I suspect most of the benefits from foam rolling are coming from what lies directly under the ITB. Here you’ll find one of the quad muscles called the Vastus Lateralis (see diagram below).

The ITB sits directly on top of the Vastus Lateralis

The ITB sits directly on top of the Vastus Lateralis

When you look at the above picture, you could easily believe that the ITB is the main player on the outside of the thigh.

However, on closer inspection, the diagram below gives a much more accurate picture, showing the relative density of the ITB compared with the huge Vastus Lateralis (VL) on the left of the picture.

Cross section area: ITB vs VL (Vastus Lateralis)

Cross section area: ITB vs VL (Vastus Lateralis)

As you can see, while the ITB gets all the attention, the vastus lateralis has a huge cross sectional area and is the real workhorse of the leg.

The vastus lateralis muscles tend to become overloaded with lots of downhill running, squats and lunges.

Some muscles in the body due to their anatomy and location, are impossible to stretch effectively. The vastus lateralis is one of them.


16cd1d267aa61c3e43a0d9b1cc09c243.jpg

Over time, one of the most common causes of pain on the outer side of the knee is from a build-up of tightness in the vastus lateralis (see trigger point referral patterns below).

Vastus Lateralis.jpg

So learning how to maintain flexibility by foam rolling in this area is hugely important to keep your knee and hip joints moving well.

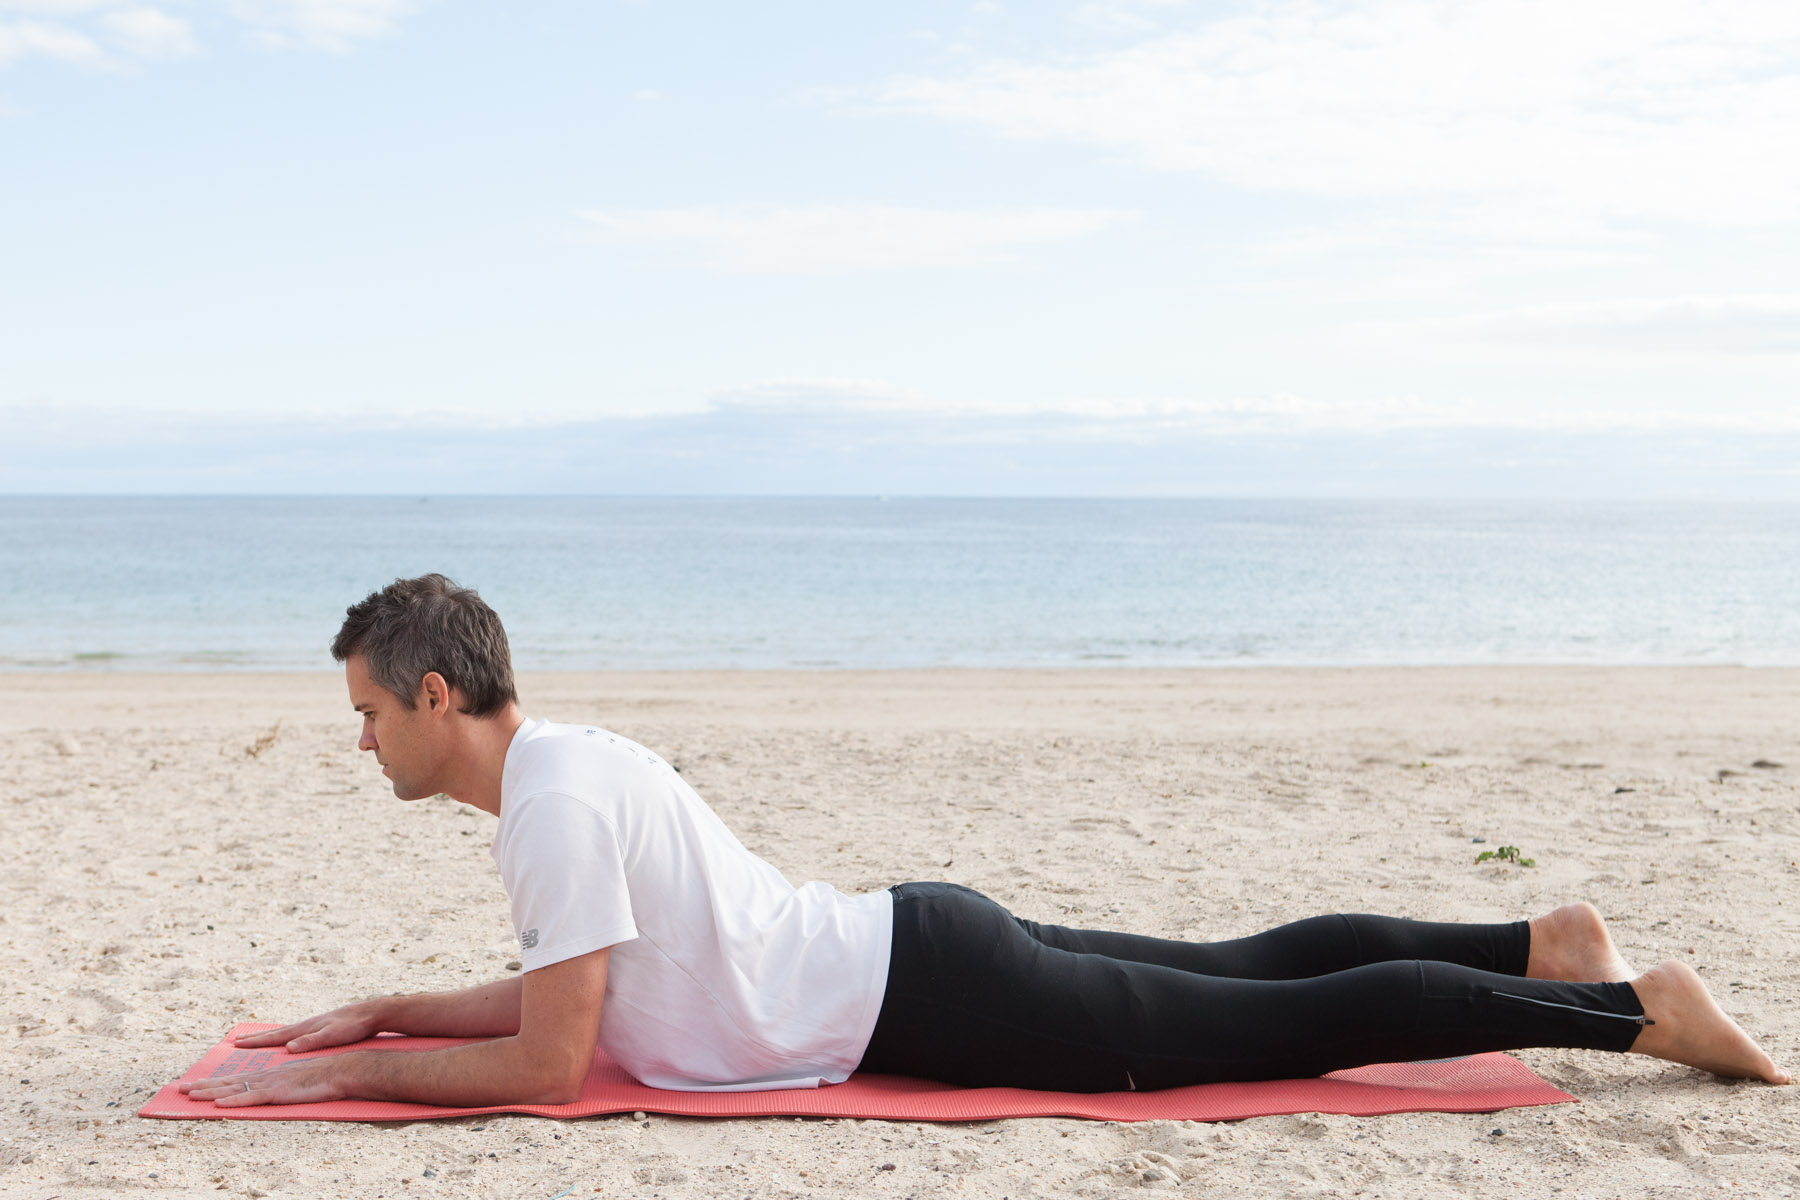
How to foam roll the Vastus Lateralis:

Benefits to foam rolling the ITB/vastus lateralis:

  • improved short term flexibility and blood flow

  • releasing the muscles under the ITB (Vastus lateralis)

  • stimulate the para-sympathetic system to activate the healing and recovery process

  • connecting with your body and bringing awareness to any overly sensitive or tight areas

Things to keep in mind:

  • avoid rolling directly over the outside of the knee and hip joints

  • should never feel more then 5/10 pain. Regulate the pressure by using your upper body and core if needed. In the words of John Rusin, “Stop mindlessly foam roll like a jackass.”

  • if you’re getting ongoing tightness, you need to get to the root cause! Consider contributing factors such as shoe wear (time for a new pair?), training habits, too many hills, inadequate glute strength and capacity, inadequate carbohydrates before and during your run, inadequate protein for recovery

  • don’t bother trying to actually stretch the ITB - it’s anatomy is too complex to get an effective stretch

When to roll:

  • if you have extremely tight leg muscles, you can roll gently before you exercise (30-60 secs max)

  • the best time to roll is after you have finished exercising, when the muscles are warmed up

Conclusion:

  • above all listen to your own body - if it feels good to you, then keep foam rolling your ITB and outer quads

  • don’t spend too long foam rolling (2-3 mins total time to roll the major muscle groups) after you exercise is enough, with perhaps one longer stretching session per week

  • an even more effective approach, target the vastus lateralis with the foam roller by rotating 45 degrees onto your front, and slowly bend and straighten your knee as you roll

  • if you’re getting ongoing tightness and pain in the ITB, seek professional help with a Physiotherapist to help identify contributing factors

Questions?

Please leave a comment below…

More from the blog:


Get To Know Your Muscles - TFL (Tensor Fasciae Latae)

Author: Daniel O'Grady is a Physiotherapist in Adelaide, Australia.

Most people know about their ITB (Ilio Tibial Band)  that runs on the outside of the thigh; but not as many are familiar with the strip of muscle that joins the upper part of the ITB to the pelvis. 

This small muscle is known as the TFL (Tensor Fasica Latae). 

If you’ve ever had problems with your knee, hip, lower back, calf or achilles, chances are you have some unresolved tightness in your TFL.


QUICK ANATOMY REVIEW:

As you can see in the picture, the ITB has upper attachments to both the gluteals and the TFL.  Any dysfucntion/weakness in the glutes means that the TFL needs to work proportionally harder.  Gluteal inhibition is common - especially if you spend a lot of time sitting.


PALPATE THE TFL ON YOURSELF:

To feel the TFL, place your finger on your front of your pelvic bone.  Slowly move down and to the outside of the thigh until you feel a ropey muscle that is the the width a finger.  It may be tender to touch.


FUNCTION:

The TFL is a hip flexor, abductor and internal rotator.  It works in conjunction with the gluteus medius and gluteus maximus to stabilise the leg during the stance phase of walking and running.  The TFL anteriorly rotates your pelvis.  Functionally, the TFL is part of the Lateral Line and the Spiral line, according to Thomas Myers in his book Anatomy Trains.

The Lateral Line

The Lateral Line

The Spiral Line

The Spiral Line


SYMPTOMS:

Overload of the TFL can lead to pain and tightness in the front of the hip.  Very common is also pain and tightness in the outer part of the knee and into the ITB.  This is most noticeable when walking or up and down stairs/hills. 

Other symptoms:

  • knee and hip pain (especially outside)

  • the lower back and SIJ

  • upper back

  • calf and achilles

As the TFL pulls the head of the femur bone forwards, chronic increased tone is one of the prime causes of hip osteoarthritis and degeneration. 

HOW THE TFL BECOMES OVERLOADED:

The TFL becomes overloaded with repeated use in the following situations:

  • excessive sitting, driving, kicking

  • walking and running (especially uphill and downhill)

  • cycling, swimming, kayak/canoe

  • meditating crossed legged in lotus position

  • sleeping in the fetal position

  • standing with a swayed back and wearing high heels too often

TREATMENT:

Physiotherapy assessment will involve a comprehensive movement assessment to determine the cause of your TFL issue.

Short term treatment such as soft tissue massage and dry needling is very helpful, while long term building gluteal and core strength is critical to prevent a relapse.


TRIGGER POINT DRY NEEDLING:

Tightness and shortening of the TFL responds well to dry needling, which can de-activate the trigger points (knots in the muscle) that can form in chronic cases.  The benefit of dry needling is that it can reach the deep fibers of the muscle and lead to a quicker resolution of symptoms.  Dry needling is certainly an unusual feeling, but definitely beats 15 minutes of deep painful massage in that area.


SELF-CARE TIPS:

  • apply heat to the front of your hip 10 minutes each day

  • avoid sitting cross legged

  • avoid walking and jogging uphills and on sloped surfaces in the short-term

  • ensure your shoes are not overly worn

  • sleep on stomach or side with pillow between knees

  • when running - avoid over-striding and endure proper warm up and cool down

  • use cruise control on long car trips to stretch the legs


GRADED EXERCISE PROGRAM TO ADDRESS TFL OVERLOAD:

PART 1 STRETCHES:

FOAM ROLLER ITBRegulate the pressure with your arms and top leg, so pain is less than 5/10.

FOAM ROLLER ITB

Regulate the pressure with your arms and top leg, so pain is less than 5/10.

FOAM ROLLER QUADSGo harder along the quads. Keep breathing!

FOAM ROLLER QUADS

Go harder along the quads. Keep breathing!

HIP FLEXOR STRETCHFeel the stretch in the front of your hip as you tuck the pelvis under gently

HIP FLEXOR STRETCH

Feel the stretch in the front of your hip as you tuck the pelvis under gently

FOAM ROLLER TFLAngle your body across the TFL and roll it with medium to light pressure

FOAM ROLLER TFL

Angle your body across the TFL and roll it with medium to light pressure

PRONE EXTENSION COBRA DECOMPRESSIONRelax on your forearms, let your hips release at the front. Breathe through the diaphragm

PRONE EXTENSION COBRA DECOMPRESSION

Relax on your forearms, let your hips release at the front. Breathe through the diaphragm

PART 2 STRENGTHENING:

The goal is to strengthen and support the muscles around the TFL

BRIDGEFeel a stretch in the front of your hips while your glutes activate in the back of the hips

BRIDGE

Feel a stretch in the front of your hips while your glutes activate in the back of the hips

CLAM SHELLEnsure hips stay facing the front and you feel the gluteus medius (back of the hip) activating

CLAM SHELL

Ensure hips stay facing the front and you feel the gluteus medius (back of the hip) activating

SINGLE-LEG BRIDGEKeep the bridge high as your transfer your weight to each side. Keep activation through the glutes

SINGLE-LEG BRIDGE

Keep the bridge high as your transfer your weight to each side. Keep activation through the glutes

PUSH-UP TO SIDE-PLANKActivate the obliques as you twist into side plank. Try x3 on each side.

PUSH-UP TO SIDE-PLANK

Activate the obliques as you twist into side plank. Try x3 on each side.

PLANKFeel the abdominals support your body. Hold 30 seconds. Keep breathing!

PLANK

Feel the abdominals support your body. Hold 30 seconds. Keep breathing!


PART 3: POSTURE / NEW MOVEMENT PATTERNS

For many people, the TFL becomes the muscle that is always switched on and over-active.

Try these movements, focusing on keeping your core and gluteals engaged.
STANDING PELVIC-TILTSUse the abdominals to gently tuck the pelvic under. Keep the shoulders relaxed and breathe through the diaphragm. x10 per hour.

STANDING PELVIC-TILTS

Use the abdominals to gently tuck the pelvic under. Keep the shoulders relaxed and breathe through the diaphragm. x10 per hour.

STANDING HAMSTRING CURLSKeep the pelvis tucked under and abdominals engaged as you bend the knee by activating the hamstring. Keep the knees aligned during the entire exercise. 3 x10 each side.

STANDING HAMSTRING CURLS

Keep the pelvis tucked under and abdominals engaged as you bend the knee by activating the hamstring. Keep the knees aligned during the entire exercise. 3 x10 each side.

REVERSE LUNGEFeel the stretch in the front of your left hip as you stretch back and drop the knee towards the ground. Keep your spine straight while gently tucking your pelvic under. x10 each side.

REVERSE LUNGE

Feel the stretch in the front of your left hip as you stretch back and drop the knee towards the ground. Keep your spine straight while gently tucking your pelvic under. x10 each side.

SIT TO STAND SQUATSFocus on activating the glutes and core as you come up into standing by gently pulling your pelvis under.

SIT TO STAND SQUATS

Focus on activating the glutes and core as you come up into standing by gently pulling your pelvis under.

Stick your butt out as you slowly sit down, keeping your feet and toes in contact with the ground. Repeat 3x10

Stick your butt out as you slowly sit down, keeping your feet and toes in contact with the ground. Repeat 3x10

Enjoyed this blog post?

Donate